Total Pageviews

Monday, December 3, 2012

Holiday tree

Sorry I haven't had much time lately to post to my blog.  My newly opened store has kept me pretty busy but, I wanted to take a minute to post some of the holiday trees I created this year.  They are very simple to make and are very cute.  They would make really cute inexpensive gifts.  This was a tree I had purchased some time ago.  I painted an empty can(this one was a can of peaches) in a rusty primer, then printed one of my own designs onto brown paper and mod podged it to the can. You can google free vintage Christmas images to find alot of really cute designs.  You could use a brown paper grocery bag if you do not have the brown paper. I then cut a piece of burlap large enough to tuck some of it into the can, then cut a slit in the center and stuck the tree through the hole.  I then cut a piece of floral foam big enough to fit snug in the bottom of the can.   I then filled the can about 1/2 way with plaster a paris and pushed the tree into the floral foam.  I allowed that to harden overnight.  I then stuffed some of the burlap inside the can and hot glued it in random spots. I picked up a string of 20 lights at the Dollar Tree and strung them on the tree.  I made the cinnamon ornaments by hand. You can find the recipe on my blog.


This one was done in the same manner as above but I used a new paint can that I had purchased from the hardware store.  The snowman were made from the same recipe that Jack was made from (the standing jack-o-lantern posted on my blog. I rolled the mixture into balls and flattened them in the palm of my hand, than layed them on a wax paper covered cookie sheet and let dry for about 3 days. I then sanded them, and painted them.  Their noses are made from 1/2 of a tooth pick.  The hats are made from felt.  I cut a rectangle shape big enough to fit their heads  and hot glued it together.  I then traced a large canning ring lid and folded it in half and cut a slit so that it would fit over their heads.  I then hot glued it to the top.  I drilled a small hole for their nose and hot glued them in place.  I hot glued a bow made of raffia to their necks. I added some homespun country material along with pine cones in random spots to the tree. I added a set of 20 lights purchased from the Dollar Tree.  I added some homemade snow to the snowman hats.  This recipe can also be found on my blog. I would love to see pics of your trees.
Happy crafting!


simple to make

Sunday, September 9, 2012

Halloween tree

This is a Halloween tree made from a coffee can. I used a large coffee can(the cardboard type) painted the entire can in 2 coats of Burnt Orange, and allowed to dry. I then painted the scene and sprayed with 2 coats of matte finish sealer. For the tree I used a real tree branch and spray painted it black. Once everything was dry I mixed up some plaster a paris and poured it in the can. I filled it about 1/2 way with the plaster a paris. I then stuck the branch in the can and carefully leaned it up against something sturdy and allowed it to dry overnight. Once dry I added some spanish moss to the inside of the can and there you have a cute Halloween tree to hang your ornaments. I have made these up to about 4-5 feet tall.
 

Friday, September 7, 2012

Jack-paper mache, Folk Art pumpkin


Meet Jack.........Jack is a paper mache pumpkin. His head, hat, and candy corns are all made from paper mache. Jack is a ooak Folk Art pumpkin design by Phyllis Spaw Designs. For anyone wanting to try paper mache I listed the basic instructions below. Feel free to email me with any questions, or comments.

For his hat I started with a medium weight cardboard and shaped it into a cone. I've had this roll of cardboard laying around that works perfect for this kind of stuff. I really have no idea where it came from or what it is used for. It is about the thickness of a cearl box. I then tore several strips of newspaper in a variety of widths and set them aside. I then used about a 50/50 mix of Elmer's white glue and water and dipped the newspaper strips into them, and wiped most of the mixture off, leaving it wet enought to apply to the hat until the hat was completely covered in the newspaper. I allowed to dry and did a second coat. I cut the brim from the same cardboard and covered it in the same manner. I glued it to the cone with hot glue. Once it was dry I used a homemade paper mache paste that I found on pinterest. You can find the receipe here
http://ultimatepapermache.com/paper-mache-clay I then used a pasty knife, or you can use a regular table knife also. I like the rounded edge of the pastry knives. They just seem to spread better. I covered the entire hat in a light to med coat of the paste and allowed to dry. This takes about 2-3 days to dry completly. Once dry I added a second coat. Once the second coat was dry I sanded it to kind of a rough finish, leaving some of the bumps and small air pocket holes to show. I then painted it in 2 coats of black. I did the pumpkin head in the same manner, but I used a plastic grocery bag from the grocery store stuffed with newspaper. I kinda shaped it by stuffing more in certain areas. I then followed the Elmer's glue/newspaper instructions for paper mache as above. Once dry I painted his head in 2 coats of Burnt Orange. I then sprayed him with 2 coats of a matte finish sealer and allowd to dry. I then mixed a bit of black with Burnt Umber and thinned it down with water, to the consistncey of ink and brushed it on a section at a time and quickly wiped some of it off with an old rag. I always keep a wet rag handy also, in case it starts to dry. I then dry brushed a few light highlights of Cadmium Yellow adding a bit more in the cheek areas. I then added his eyes, mouth, and nose. His legs are made from cut off railings, used to make the railings on a stairway. They were painted in Black and Burnt Orange and then sealed. Once everything was dry I drilled holes for his legs with a spade bit. I patched up the hole a bit with some of the paper mache paste and allowed to dry. I had already drilled a hole in the top of his head so I pulled out some of the newspaper with a pliers and then poured plaster a paris into the hole, to help keep his legs in place and nice and sturdy. Once dry I added some burnt Umber to his shoes, using a dry brush to make them look a little dirty. I then put a zebra pattern ribbon in his shoe strings then set him in his shoes. I also poured some plaster a paris in his shoes. Allow to dry overnight. I did the candy corns in the same paper mache method as above. I used some floral foam to cut the shape from, using a craft knife. I painted them in white, Burnt Orange, and Cadmium Yellow. I added a piece of twisted wire to the tops of the candy corns. I tied an orange ribbon around his hat and then glued the candy corns to the hat and then glued the hat to the pumpkin. I then hot glued natural spanish moss around the hairline and stuffed some in his shoes. I then lightly sanded areas on his legs, and there ya have it, a cute decoration for a porch, mantel, or where ever you choose. Jack stands appx 44” tall from the tip of his hat to the bottom of his shoes.

Sunday, June 17, 2012

Denim pockets


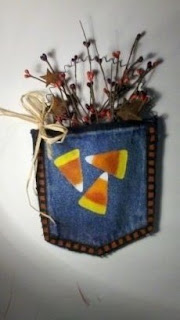
Gotta love those denim pockets.  You can do so many things with them.  Below is a free tutorial on how to paint a couple of Halloween designs onto them.  A quick, easy, cute project.

Supplies
Denim pockets of your choice
Scissors-to cut out denim pockets.
Acrylic paints- Black, Burnt Orange, Burnt Sienna, Cadmium Yellow, and White
Candy corn stencil-I cut my own from a piece of mylar using a craft knife, or you can just sketch them on with a pencil and paint them in. I purchased the mylar at Wal-Mart.
Witch boot stencil-purchased from Laurie Speltz(The Creative Coach).
3 Medium stencil brushes
#4 filbert, and a #10/0 liner brush.
Small checkerboard stencil-purchased mine at Michael's Craft Stores.
Candy of your choice
2 pieces of raffia
Fall bittersweet picks with rusty stars.
Wire cutters
2 pieces of black annulled wire-to make the hanger. Cut one to 24" and one to 18". I purchased mine at Ace Hardware.
2 small pieces of wax paper-to place in-between the pocket so that the paint does not soak thru the other side, and one for your paint palette.
Paper towel-to remove the excess paint of the stencil brush.
Small craft knife
Pencil
Masking tape or black electrical tape-to tape your stencil in place.
Small wooden dowel-to make curly wire(optional).

To learn more about stenciling see TIPS AND TECHNIQUES, on this blog and scroll down to stencilling.
Begin by cutting out your denim pockets. Once they have been cut out, place a small piece of wax paper in-between the pocket so that the paint does not soak thru to the other side, and set aside until needed.  Prepare your stencil by sketching a candy corn onto the mylar and cut out with a small craft knife. Be sure to cut it onto a surface that you will not cut thru. I use an old piece of hardboard to place the mylar on.  If your not feeling creative enough to sketch your own stencil, search the web for free candy corn templates.  There are several available.


Candy corn pocket
Begin by taping your stencil down onto the denim pocket, and stencil in the candy corns in a coat of white, then stencil in the  appropriate colors using your stencil brushes.  This will take 2-3 applications to get a good cover.  When dry tap in a bit of Burnt Sienna, just under the Cadmium Yellow.  Apply 2-3 coats of Black around the edge of the pocket using the #4 filbert, and allow to dry.  Once dry stencil in the checkerboard in Burnt Orange. Now cut your piece of wire to 24"  Starting on the back side of the pocket, gently push and twist until the wire pokes thru to the front side.  Leave about 2" sticking out.  Now take one of your paint brushes or a small wooden dowel and begin wrapping the wire around it, again leave about 2" to push thru to the other side.  Now pull the wooden dowel out and stretch out the wire a bit to form a nice hanger. Now twist the 2" piece in the same manner and push flat against the pocket. Allow to dry and cut your Fall pics to your desired size and stick them down into the pocket.  Add the raffia bow to the side and you have a cute Fall decoration.


Witch boot stencil
Follow the same instructions as above for stenciling in the witch boots.  I then lightly sketched in the socks with a pencil and painted them in with the #4 filbert, using the Burnt Orange.  This will take about 2 coats to cover.  Once dry add the black stripes with the #10 liner. Allow to dry and follow the instructions above to add hanger and raffia.  Fill with candy of your choice for a cute treat pocket.
You could also stencil in words such as trick or treat, Halloween, treats, or whatever else you see fit.


Tuesday, May 1, 2012

Paparazzi Jewlry


Have you heard about Paparazzi Jewelry......It is some pretty awesome jewelry and very inexpensive.  I purchased 2 bracelets for $11.00 total...can't go wrong at that price.  They have become some of my most favorite bracelets.  I liked them so much I purchased 2 necklaces for the same price and 2 bracelets for my 2 grand daughters that attended, and they were even less.  I think 2/$5.00  To view some of the jewelry or if you have questions, visit  http://www.facebook.com/#!/pages/Paparazzi-by-Jessica/452832284732191  Don't forget to like her page.

Sunday, March 11, 2012

How to make your own silicone lights


   Check out the Pickled Pepper Patch....There is a great tutorial on how to make your own silicone lights, along with alot of other tutorials.  They truely have a great blog! A must see! Follow the link below http://charsethman.blogspot.com/2009/11/tutorial-tuesday.html

Saturday, March 10, 2012

Styrofoam Easter bunnies

Since Easter is just around the corner, I wanted to share these little guys.
They go back to my childhood days.  My dear aunt has made these as long as I can remember.  She would sell tons of these at the church bazars.  God rest her soul she passed away last year at the age of 92.  She was a big inspiration to me as a child.  I used to spend a week with her in the summer, and it was craft heaven for me.  I could not wait for that week to arrive.

Sunday, February 26, 2012

Winter Denim pocket


Cute and very simple winter craft idea.  I cut out a denim pocket from an old pair of jeans, and a hat and a mitten from an old flannel shirt. Used a small piece of white felt for the brim of the hat and the top of the mitten.  Whip stitched around the edges, and stuffed it full of pine, pine cones, and berries, or whatever else you may have laying around.   Hot glue a pom pom to the top of the hat.  Embellish with raffia, buttons, or ribbon.  Cut a small hole on both sides of the pocket to add the  wire hanger.  For the snowflake, I used a large snowflake stamp, dipped into white acrylic paint.

IDEAS for this project:
You could stick a wooden moose cutout and some pine, stencil a moose, or cabin on the front for a cute country cabin look, you could fill it with Cinnamon sticks, cloves, nutmeg, stencil a cute kitchen saying on the front, you could use iron on transfers and do some holiday ones using the free vintage images on the web, you could modpodge items onto the front of the pocket such as all red  buttons shaped into a heart for Valentine's Day, you could use acrylic paints and paint a primitive snowman on the front, you could stuff it full of primitive snowmen.  Lots of ideas for this simple project.  Please feel free to submit any ideas via my email, or on my comments page. 
enjoy!

Tuesday, February 7, 2012

Resurface a rusted cast iron pan


STOVE AND GRILL POLISH
Ever run across that perfect vintage cast iron piece you just gotta have. You want  to paint it, but it is so covered in rust you are having second thoughts.  Here is the magic solution.  It's called STOVE & GRILL POLISH-BLACK LIQUID.  I purchased this at Ace Hardware.  Thanks to my buddy Jack, he knows a little about everything.  I don't know what I'm going to do when he leaves.  I was lucky enough to get 4 cast iron campfire pots, but they were really rusted.  So, here's how it works.  Using a med to course grade steel wool I cleaned it up and washed it out with soap and water.  Allow it to dry completely and using a sponge begin applying the STOVE AND GRILL POLISH.  It protects and covers the rust like magic. This is amazing stuff! (See photos of before and after below).  You of course, can not cook with it after using this stuff or put food in it unless you line it with something that allows you to do so.  It is solely for decorative purposes.  I made a cloth lining for the Halloween campfire pot below so that it could be filled with candy.


BEFORE


AFTER


SNEAK PEEK OF FINISHED POT


Thursday, February 2, 2012

Make your own snow textured paint


Making your own snow texture paint is fairly easy.  You will need the following items:

Crumbled stone texture paint texturizer(purchased at Ace Hardware)
Measuring cup
Measuring spoons
Any White acrylic paint
Stiff bristle brush-to apply
Airtight container for storage
Fine glitter-optional
Paper towels for clean up

Pour about 1/8 cup of White acrylic paint into your measuring cup. I used a 1/4 cup to allow room for mixing. Now add 1 level tablespoon of the Crumbled stone texture to the White acrylic paint and mix with the handle of your brush. Simple as that. Apply to your project with a stiff bristle brush and allow to dry.  It will take several hours to dry.  The project shown above was done onto a mason jar lid. You may sprinkle with fine glitter to add a bit of sparkle if you choose.  This must be done when the snow texture paint is still wet.

Make your own crackle finish


MAKE YOUR OWN CRACKLE FINISH
You will need Elmer's white glue, a paint brush, and a container to pour the glue into.
Apply a base coat of paint to your project.  I used black acrylic paint.  Allow to dry and apply a 2nd coat, and again allow to dry.  Once dry spread a good coat of  white glue to the entire project.   Experiment on a scrap piece of wood, before applying to your project.  Allow to dry to a tacky state, and apply an acrylic topcoat of your choice.  I used Orange for a Halloween project I was doing.   You will begin to see the cracks appear as it dries.

Remove dried paint from your brushes


HOW TO REMOVE DRIED PAINT FROM YOUR BRUSHES
Squirt a small amount of hand sanitizer onto a piece of wax paper and stroke back and forth to load it into the brush.  Wipe onto a paper towel.  Repeat process until it wipes clean on your paper towel.  Be sure to clean your brush with soap and water when done, as the alcohol in the hand sanitizer will dry out you brush.

Tuesday, January 31, 2012

Eaisly remove labels with a heat gun.

My dear friend  Paula passed this tip along to me a few years back:  Use a heat gun to easily remove labels from jars, and cans.  Heat it up a bit, but not too much.  You'll see the glue starting to melt.  Just wipe it off with a damp cloth.  Be sure to do this in a safe area, and make sure there is nothing laying around that may catch fire.  Always use caution!

Thursday, January 26, 2012

Witch coffe can treat container


This is such a cute project.  A coffee can made into a witch, that can be filled with candy or anything of your liking.  Here's what you will need:
One 33 oz coffee can-I used the kind that are made from a heavy cardboard as they are a smooth surface
An old funnel, or you could use a large plastic kitchen funnel.  Just be sure to spray it with a primer so that the black paint sticks to it
One piece of black felt
Spanish moss-natural color
Hot glue/glue sticks
Spray sealer-matte finish-I used Krylon matte finish
Le Plume pigmented marker-I would imagine a fine and medium tip bic marker would work also.  Although I have not actually tried it
Lots of candy
Bag of shredded paper or you could crumble newspaper-to put in the bottom of your can
Homespun Black and Orange material, or a color of your choice-one piece cut to 1 1/2" wide x 18" long
(for the brim of her hat) and one piece big enough to go around the top and tie a bow
Scissors
A can of light colored spray paint in a matte finish- I used Krylon indoor-outdoor Almond
Pencil
A light colored crayon-to trace the brim or her hat
Paints
These are the paints I used.  You can use whatever brand works best for you.
Flat Black-Apple Barrel
Burnt Orange-Americana
Apple Orchard-Folk Art
Cocoa-Americana
Flat White-Apple Barrel

Brushes
3/4"-1" flat brush
#6 filbert


Peel off the label and spray paint the entire can including the top of the lid with 2-3 light coats of spray paint.  This will act as a primer so that your paint will stick to it.  Allow to dry in-between coats and be sure to do this in a well ventilated area.   Read the instructions on the can.  Once dry brush on 2-3 coats of Coco using the 3/4" flat brush and allow to dry.  Apply her cheeks with a mix of Burnt Orange and Coco with the #6 filbert, brushing in a circular, tapping, motion.  Lightly draw on her face with a pencil.  Using the #6 filbert- apply the eyes in 2 coats of white, the pupils in black, and her nose in Apple Orchard. Using the Le Plume marker  add her mouth and  teeth, outline around her nose, eyes, and the eyelashes. Add the highlight in her pupil using the #6 filbert, in white.  Allow to dry and add 2 light coats of spray sealer.  When dry add her hair by cutting long pieces of spanish moss  with your scissors, and hot gluing it the her head.  Apply as much or as little as you like.  Now give her a hair cut if need be.  Remember as a child you were not allowed to cut your doll's hair....love this part!  Now for the hat it will depend on what you are using.  I had a metal funnel with a handle that already had a primer on it, so I just painted it  with 2 coats of  black using the 3/4" flat brush.  If you are using a plastic funnel you will need to spray it with some type of primer, then apply the black paint.  I also painted the top of the lid in 2 coats of black with the 3/4" flat brush and sprayed 2 light coats of the matte sealer.  Now  find a round item, like an ice cream pail lid, or the lid to a pan that is about an inch or so bigger than your coffee can lid and trace around it onto the black felt, using a light colored crayon.  As you can see in the pics above I used a lid to a pan.  You can easily wipe the crayon mark off with a damp cloth.  Now providing your lid is dry hot glue the felt to the top of the lid.  I just added the hot glue all the way around the edge.  Press firmly in place.  Now tear, not cut, your homespun material to the lengths listed above and hot glue on the funnel for the band on her hat.  I folded it over a bit to fit, leaving the torn edges at the top(see pics above). Add the bow at the top of the funnel.  Now glue the funnel to the felt part of the lid, and you now have a one-of-a-kind treat can, that can also be used for a cute center piece.  Fill the bottom with some shredded paper and fill with candy, bath and body items, or anything of your liking.  I'll be adding more coffee can treat containers soon....snowman, scarecrow,santa,prim pumpkin........
Enjoy!


Sunday, January 22, 2012

Cinnamon ginger boy cutouts

How to make mini cinnamon, applesauce, ginger boy cutouts

My friend asked me a while back why I don't make those good smelling little ginger boy cutouts anymore.  My reply was you know I don't know.    I have not made them in years.  Not sure why cause they smell sooooooooo good, and they are really cute.  So, I decided to dig out my recipe and get some made.  They look good in a bowl filled with potpourri. Cute and festive. 


Here's what you will need:
A small ginger boy cutout
Measuring cup and measuring spoons
A bowl to mix it in
Spoon to mix it up
3/4 cup of applesauce
1 cup of cinnamon-2/$1.00 at dollar store-oh ya! You will need some extra to sprinkle on your rolling surface
2 tablespoons of white glue-any white glue will work
Ground cloves-a few sprinkles to your liking
Ground nutmeg-a few sprinkles to your liking.
Rolling pin
Wax paper
Put all ingredients in a bowl and mix until a dough forms. If your dough seems a bit dry just add a little more applesauce.  Lay out your wax paper and use it for a rolling surface.  Sprinkle the wax paper with a little of all three spices.  Roll and cut.  Allow to dry for several days.  I flip them every day until they are completely dry.  They will get fairly hard when completely dry.  Lay them out to dry onto a piece of wax paper, and whatever you do....don't leave your cookie cutter in the garbage disposal.  This is what happens when you do.  I think I have had this cutter for 20 years.  Dang! now I have to go find a new one.

Enjoy!

Friday, January 20, 2012

How to make "grungy" flicker lights

How to make your own grungy tea lights.

 These are so easy to make and smell really good too!  Here's what you will need:
Electric flicker lights
A small container to pour your glue into.
Any white glue, such as Elmer's white glue
A small stiff flat brush to apply the glue-doesn't have to be a stiff bristle, but I think it goes on easier
Wax paper-makes clean up much easier
Ground Cinnamon, cloves, and nutmeg-You can grind your own, if you have a coffee grinder.  You can get more of a course chunkiness(made that word up) by doing it this way.

Begin by laying out your wax paper, or your work area.  Gotta love this stuff.  So easy to clean up when done.  Pour some white glue into your container, add a little bit of all your spices,mix it into the glue, and simply apply with your brush to the flicker light.  Apply it in kinda heavy, clumpy coats, but not to where the glue is running all over the place.  Just play around with it and you'll get it.  Be careful not to get it on the flicker light like I did.  Allow it to dry and add as many coats as you desire.  More than one coat is required to get a good grungy appearance.  When you are done adding your grungy brew, apply another coat of plain thinned down white glue, and allow to dry.  There ya have it, grungy flicker lights.    You can use this recipe on alot of things, just be careful it is something you can safely apply it too. For example do not apply it to a candle you are going to burn!
Enjoy!
Phyllis